The inspiration
Multiple exposure is a technique that existed long before the digital era, but it’s only quite recently that the feature has been incorporated into digital cameras. Multiple exposure photography has become a popular way of creating unique artistic images and can be achieved not only in-camera but also by using post-processing techniques.
It is a technique that has been embraced enthusiastically by several of our members, although for others it is not part of their usual ‘toolkit’. It’s relatively simple, especially if you use an app on your smartphone, so even if it’s not your preferred type of photography, here’s an opportunity to have a go!
What is multiple exposure photography?
Multiple exposure photography involves combining two or more images into a single image. Just adding a layer of texture to give a different ‘feel’ to the subject is, strictly speaking, a multiple exposure image, but combining two or more different images results in more complex composite images. Your images might involve images of the same subject taken from slightly different angles or at different orientations, layered one over the other, or you can combine different subjects and backgrounds in a variety of ways, including full or partial overlays. Using different ‘blending modes’ to combine any two or more images will create a vast number of unique images, often with surreal or artistic effects.
The Challenge
This Challenge invites you to create up to five multiple exposure images, each comprising two or more images. Your multiple exposure images may be created in-camera using built-in functions, or by post-processing techniques using your usual image software or an app on your smartphone.
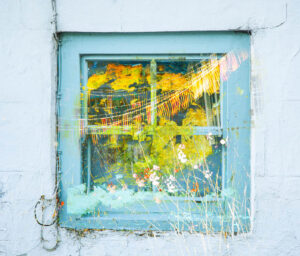
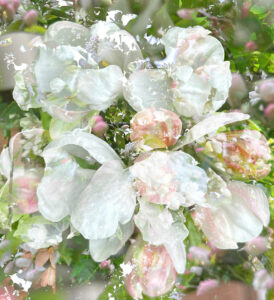
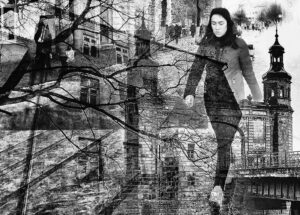
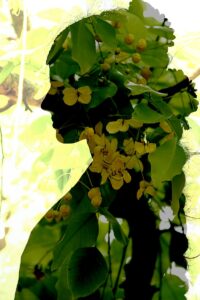
Examples of multiple exposure images
Here are a few examples:
How to achieve multiple exposure images
A. In-camera
(i) Multiple exposure and blending modes
Many modern cameras allow you to capture two or more frames as multiple exposure shots (for example, a Fuji XT-5 captures up to 9 frames). Set your camera to multiple exposure mode, which can usually be found in the menu under ‘shooting mode’ or ‘exposure mode’. You can select a multiple exposure blending mode and choose how the exposures are combined.
(ii) The photos
Your first photo, the base layer, is generally the ‘subject’. High-contrast photos with distinct light and dark areas are good for this. A rule of thumb is to use a darker subject or scene as your base exposure image and try to make sure that its background is light and not too busy. A silhouette can work well as a base layer.
Your second photo might have more texture and colour – for example, a field of flowers, a landscape or a night-time cityscape. For example, a silhouette of a person against a bright sky, combined with a landscape with rich colours and textures can create a striking effect. On the other hand, combining abstract patterns, textures or geometric shapes can create surreal dreamlike images. You can add further images as you wish, up to the maximum possible with your particular camera. However, be aware that more is not necessarily better!
One of the benefits of using in-camera multiple exposure is that you can get an indication of whether it’s going to work or not as you go along, but don’t expect to come out with the finished image. You can still tweak the image in post-processing, or combine it later with other elements, such as a texture.
(iii) Camera settings
There are no hard and fast camera settings for this type of photography, but the light from your second exposure will impact and may darken your first exposure, so you could underexpose your images slightly.
Manual camera settings or aperture priority both work, although aperture priority means you can focus on the effect of the overlaid details within the composition rather than thinking about exposure and shutter speed. Changing the white balance can affect the colours of your resulting images and using a low ISO will produce less noise.
Different focal length lenses will give different results. Most digital cameras will store the first shot on your memory card before you shoot the second one, so you can even swap lenses, change your filter, move to a different location, or combine a macro image with a landscape.
B. Using post-processing to combine individual images and ‘finish’ the composite image
(i) Using image processing software
Many commonly used image processing software packages will allow you to merge individually captured images and give you precise control over the blending process. These include Photoshop, Affinity, Capture 1, Luminar and GIMP. You can achieve a similar effect by using Lightroom’s HDR ‘merge’ feature, but it lacks some of the advanced features, so you may want to open images as layers in alternative software such as Photoshop.
You can adjust the opacity of the various images, refine them with layer masks, and use different blending modes to achieve the desired effect. And, as with any image, you can use your editing software to ‘finish’ your multiple exposure image.
(ii) Using smartphone apps
If you don’t have one already, you can download an appropriate smartphone app, for example:
- Snapseed (iOS and Android): A popular mobile photo editor, which can be used for creating multiple exposures. The ‘Double Exposure’ tool allows users to blend images together, adjust opacity, and choose different blending styles to achieve various creative effects.
- Blend Editor (iOS-exclusive): A “user-friendly” app that offers various blend modes for creating double exposures.
- Canva Image Blender (iOS and Android): A recommended app for creating double exposure effects that “effortlessly merges or blends images”.
- Enlight Photofox (iOS-exclusive): Uses layers and blending modes to help you “turn creative ideas to brilliant art” on your iPhone. You can combine, blend and merge up to five layers (2 layers in the free version), where you edit each layer as your build your final creative image.
- Pixlr Express (iOS and Android): Use Pixlr Express’s blending modes to “create seamless transitions between images”. After adding an image layer, select it in the Layers Panel and access blending options like Multiply, Overlay, or Screen to merge your images creatively.
- Wengi Wengi (iOS and Android): An app that “seamlessly blends multiple images”.
- ImageFlux (iOS): Blend RAW photos, create double exposures, and “build layered compositions in seconds”.
C. Processing workflow
(i) Open your images
Select the images you want to combine and open the chosen images as layers within your editing software. You can experiment with changing the order of the layers. If using RAW files, you may need to process them in a program like Lightroom before bringing them into your editing software.
If you are using a smartphone app, open your main image and add a new image using the ‘multiple exposure’ tool.
(ii) Arrange and experiment with blending modes
Position the layers or open the images however you like and experiment with different blending modes to achieve the desired effect.
The most traditional blending modes are ‘Additive’ and ‘Average’, but you can combine images in many other creative ways, for example ‘Multiply’, ‘Screen’, ‘Overlay’, or ‘Soft light’.
(iii) Adjust and refine with layer masks
Fine-tune the exposure, contrast, colour, and other aspects of each layer to create a balanced and visually appealing composite.
You may want to use layer masks to selectively hide or reveal parts of each image, which allows for greater control over the blending. Adjusting the transparency of the top layer allows the underlying image to show through, creating a layered effect.
Composite images created using your smartphone app can be further refined using other smartphone apps, or of course using your usual post-processing software, such as Photoshop.
(iv) Save and share
Save the final composite blended image in the desired format.
D. Final tips
- There are no rules, and no right or wrong ways – experiment and play with different combinations of images and blend modes to achieve unique effects. Most of all, have fun!
- Keep it simple to start with – think lines, shapes, patterns and tones.
- If you need more help or inspiration, you will find plenty of informative articles and YouTube videos on the internet.
- Multiple exposure photography might not be everyone’s preferred technique, but why not give it a go? We’re looking forward to seeing your images!
Submitting your images
- Please submit up to five multiple exposure images by midnight on Sunday 31 August using the simple new upload system, described HERE (please do NOT send your images by We Transfer).
- In summary, you need to prepare your images as follows:
- Images should be JPEG files
- The image dimensions of your images must be a maximum of 1600 pixels wide or 1200 pixels high.
- Image sizes must be less than 500kb. If not, please save your images at a lower resolution until they are.
- Please make sure that you save your images with file names according to the instructions in the link above e.g. York church towers, Freya Frost or St. Andrew’s Church stained glass, Fred Frost, or A touch of frost! Charlie Chaplin.
- Please login HERE, be sure to select the ‘Challenge #21’ Category, and upload your images (double checking that your file names are as required).
- Please note that your images will not be acknowledged by the Web Team, but provided you can see them all when you click on ‘My Images’, we are able to see them too and they will be included in the gallery.
Acknowledgements
I am very grateful to Carol Clarke for her helpful comments and for allowing me to use two of her multiple exposure images as examples (window and flowers). I also acknowledge with thanks the monochrome image by Alexander Tarasenkov (Creative Commons, CC BY-SA 4.0) and the ‘Mysterious Leaf’ image by Michael Pravin (Creative Commons, CC BY 2.0). Thanks also to Julia Walton for checking the final draft.
The following articles provided helpful information in drafting this Challenge:
https://janinawilde.com/blog/what-is-multiple-exposure
https://www.theschoolofphotography.com/tutorials/double-exposure-photography
https://progradedigital.com/seeing-double-a-guide-to-multiple-exposure-photography/